Go step by step through a test sheet, learn how to set it up and input information.
Starting a New Test
Click File → New test or use the “New test” button to begin.
Verify the test standard selected (e.g. ASTM, ATTMA, EN13829) matches your project requirements (found under Tools → Options for defaults).
Equipment and Calibration Data
Fan Model & Serial Number: Select and enter your fan; press the wrench icon to open the calibration dialog and input fan-specific flow coefficients.
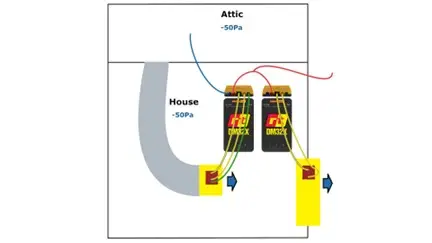
Gauge Info: Add your digital gauge (e.g., Retrotec DM‑2 or DM‑32), then use the wrench icon to enter its calibration corrections.
Building Data & Environmental Conditions
Building Dimensions: Input floor area and envelope area per standard.
Location & Weather: Enter operator location (inside/outside), temperature, barometric pressure, wind speed, and wind direction.
Bias/Baseline Pressure: Record initial and final baseline readings to capture natural pressure offsets.
Test Settings & Data Sets
Adding Data Sets: Use the New Set button to compare tests (e.g., pre- and post-seal). Remove or clear sets as needed.
Pressure Points: Manually enter induced pressure levels (10–60 Pa typically) or let the software set them in Auto/Semi-Auto mode.
Fan Pressure Lines: You can have multiple lines if you change flow range plates mid-test. Each one corresponds to fan + range.
Running the Test
Manual Entry vs. Auto: Switch between “Enter data manually” or enable automatic data capture. Auto disables manual edits.
Range Changes: FanTestic will prompt if flow is too low or fan maxes out, pausing for range adjustments. Manually select new range if needed.
Final Results and Reporting
After inputting sufficient points, the software calculates leakage metrics, air change rates, curve coefficients, and compliance with deviation checks.
Save & Export:
Use Save As to label test files.
Generate reports in Word or export raw data to Excel.
Print screenshots via File ➝ Print from the screen view.
Why this Matters
Complete & accurate inputs ensure reliable results and compliance.
Built-in calibration steps boost measurement precision.
Auto/Semi-Auto flexibility caters to different testing needs.
Professional output streamlines reporting and client delivery.
Pro Tips
Always confirm your test standard and saved settings before starting.
Keep fan and gauge calibration data up-to-date in the wrench dialogs.
Use baseline bias values to measure natural infiltration influence.
Name data sets and files clearly for later reference.